
Thursday, March 28, 2013

Wednesday, March 27, 2013

Monday, March 25, 2013
I Know What I am Going To-Do Today
This past week was busy, but much of what I was doing was work for Emily Herrick that I can't show you any pictures :( The two quilts that I quilted and bound for her are actually for Michael Miller. The BEST part of the week was that I was over at her home last Tuesday when she cut into her new fabric line, Technicolor. It is WONDERFUL! I am going to be finishing up a quilt top using Technicolor today. SUPER FUN!!!
Last Thursday I was also able to attend my first SLMQG meeting. It was FANTASTIC!! The quilts were AMAZING and the quilters were even MORE amazing! I had the best time and will be attending from now on.
This week I also plan on getting a few more "Letters to my Daughter" quilt blocks and another border or two of the Medallion quilt.
2 pair of slippers for Aly DONE! Blogged HERE.


Back Burner Purgatory... lol!!! ;) (I've got the materials for these, but no chop chop yet)
Last Thursday I was also able to attend my first SLMQG meeting. It was FANTASTIC!! The quilts were AMAZING and the quilters were even MORE amazing! I had the best time and will be attending from now on.
This week I also plan on getting a few more "Letters to my Daughter" quilt blocks and another border or two of the Medallion quilt.
WIP's -in some form of progress...
Challenge quilt for The Peteetneet Quilt Show
"Letters to my Daughter" block of the month (6 finished out of 25)
Medallion Quilt for the Utah County Modern Quilt Group I've started piecing the selvedge border. I hope to get more of it finished this week :)
"Letters to my Daughter" block of the month (6 finished out of 25)
Medallion Quilt for the Utah County Modern Quilt Group I've started piecing the selvedge border. I hope to get more of it finished this week :)
For Hire Projects
MaryAnne's jean quilt


Back Burner Purgatory... lol!!! ;) (I've got the materials for these, but no chop chop yet)
White booties for Hadley
2 Twin Size applique quilts for my nieces
***BONUS FINISHES***
Lots of things for Emily:
Three quilt backs
Quilted 2 quilts
Bound two quilts
Started to piece a quilt top
Lots of things for Emily:
Three quilt backs
Quilted 2 quilts
Bound two quilts
Started to piece a quilt top
So, what are you up to this week? PLEASE share with me :)
Saturday, March 23, 2013
505 Shopping
I always buy my 505 from Amazon.com for abt $18 per can, shipped. Thursday night at the SLMQG Sukie offered me TWO cans for $20 :)
So what is the difference? The best I can tell is that one can has an international packaging and the other is packaged for the US.

Do you know of any other differences?
So what is the difference? The best I can tell is that one can has an international packaging and the other is packaged for the US.

Do you know of any other differences?
Friday, March 22, 2013
Meet My Machine
Funny story! For the past few weeks my sewing machine has been making a "whirring" noise near the wheel when I sew. I was REALLY upset and worried, so Saturday I sent it off to my trusty Sewing Machine Doctor, Dan, for a check-up. Of course, my mind was running wild and I feared the worst! Would I have to buy a new machine? I mean, really, I can't be without a sewing machine. ...and I CAN'T afford a new one :/
Sunday night, I started texting all of my sewing buddies, asking them what sewing machines they have. I scoured the internet for prices and reviews. SO, so funny, I ran into this "Meet My Machine" blog tour in my searching dither :) What Serendipity :) Perfect timing :)
Finally, on Monday afternoon, Dan called to let me know the news. MY MACHINE WOULD LIVE!!! ...and be just fine :) As it turns out, about 5 pre-wound bobbins worth of thread found their way into my wheel and bobbin winding thing-a-ma-jigy area. He saved a small part of the thread to show me.

He said it took him forever to dig it all out :/ Sorry Dan! ALL HAIL DAN!!!
He thinks the thread made it's way into the gear area through this opening.

I will be slapping some blue masking taper over that baby before I sew again ;D
So, let's get on with the "Meet My Machine" part of this blog post :)
After I got married, my mom gave me her old Kenmore sewing machine. It was in pretty bad shape and I needed to get a better machine (aka- one that works) if I was ever going to be able to sew something :)
I headed over to the Cotton Shop in Provo, Utah about 18 years ago. I had two little girls and I was having a ton of fun sewing sun dresses for them. :) I don't remember who helped me, but he was wonderful!
I told him that I was looking for a machine that would work for the rest of my life. (I also bought a serger at the same time.)
The main selling point that won me over on this machine was that it was made with all metal parts. At the time, Pfaff was still making sewing machines in Germany, and this model was made in Germany.
For any of you who have sewn on a pre 1970 singer sewing machine, you can appreciate the beauty of a well made, "all metal parts" sewing machine. They are smooth and just get better with age.

(please ignore the cardboard and blue tape... I'll explain later)
After much discussion (and a bit of drooling over the fancy machines in the store), I chose the Pfaff Varimatic 6085, and I have been thrilled with it ever since. It is my BFF!!! I really, REALLY love my sewing machine!!!

It has a few basic stitches. The button hole and zig zag are great. I wish it had a blanket stitch. I don't really use any of the fancy stitches. If you know what they are, leave me a comment. Maybe I should try a few ;D

My favorite machine accessory is my darning foot. This sweet little machine loves to fmq and I even quilt king sized quilts with it. My machine ROCKS!!!
My favorite feature is that my machine sews and sews and sews... I plan to die before this machine does ;)

The cardboard and blue tape are there to level my extension table top that my dad made for me :)

Very soon after I started to fmq, I realized I needed more table top area.

My dad made this for me :) He is the BEST and it's makes fmqing a breeze!

The black line is for when I am sewing binding strips together on the bias. It keeps me from having to mark the fabric. Some quilters use tape or a ribbon. I figure it's my machine and my table so why not go all in and use a sharpie ;D It works for HST's too :)
My machine does not have a name but this is my machines fancy tattoo.

I would 100% recommend this machine to a friend. ...but since they don't make it anymore, my best advice would be to spend the money and get a machine that is well made. All of the bells and whistles wont do you any good if you are forever repairing or having to replace your machine.
If I could have any machine for free, I have no idea what I would choose. I would probably spend a ton of time at every dealer in the state test driving them all. ...what a fun time that would be :) I would pick a machine that has a needle up/down option and it would need to have a blanket stitch :)
To see my sewing area, click HERE. I sew in the corner of our family room. I would move into a bedroom, but then I would never be seen again. This way, even if I am engulfed in a sewing project, I am still with everyone :)
To meet everyone's sewing machines, head over to The Tilted Quilt for the linky party.
Thursday, March 21, 2013
Crochet Booties
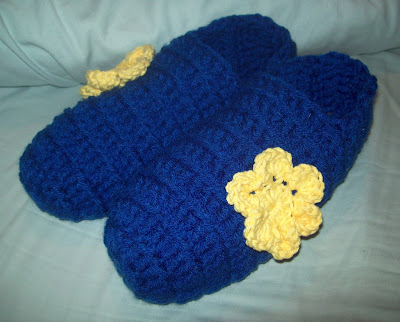
A little while back, my sister Alyson asked me to make a pair of Mary Jane booties for her friend's baby and a pair of slippers for her to boot :)

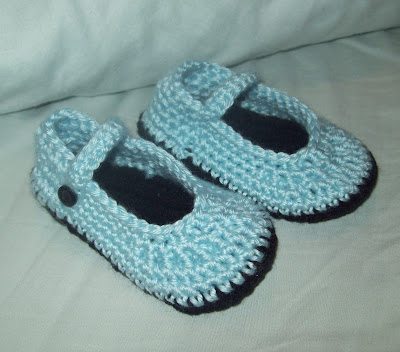
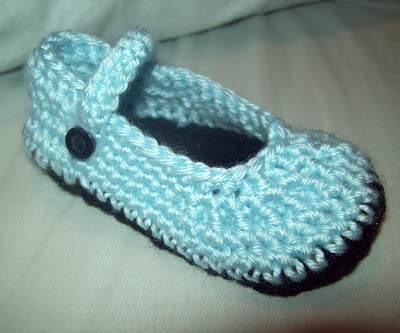


THIS is the pattern I modified to make these. The pattern is for a small child, but it was easily converted into an adult sized slipper. It is called "Crochet Clog Slippers."
They are headed off in the mail today along with the Whirlygigs quilt. Oh the joy!

The body of the Mary Jane booty was made from THIS pattern on Etsy.

It's called Buccaneer Booties by Mamachee. I made a few modifications to turn it into a Mary Jane.
Pretty cute, eh?

Alyson wanted some slippers for herself too.

She wanted royal blue with a little bit of sweetness.
THIS is the pattern I modified to make these. The pattern is for a small child, but it was easily converted into an adult sized slipper. It is called "Crochet Clog Slippers."
They are headed off in the mail today along with the Whirlygigs quilt. Oh the joy!
Wednesday, March 20, 2013
New Ironing Board
One day last week I woke up and determined that I was going to buy a new ironing board. My old one hangs on the back of my family room door and is very inconvenient to use :/ I have a portable one, but it is just too small.
Well, before I headed out, I thought that maybe I should try to post on Facebook and see if anyone has an ironing board that they aren't using. [I am a firm believer that anything you need is probably just sitting around in your neighbors house, unused and wasting away...you just have to find the right neighbor ;)]
GUESS WHAT?? I was right :) Within a few minutes, one of my neighbors messaged me about her annoying, unused old ironing board :) Ta-Da!!! :D
I popped over and grabbed it :) It didn't have a cover anymore, so I needed to make one. No problem!

I dug through my old upholstery fabric and found this fun red gingham. I threw it in the wash on HOT with a teaspoon of Synthrapol (BEST STUFF EVER!!) I used a few layers of left over batting and a top layer of Insul-Bright. I popped on some elastic and we were through! Right?

Not so much :( My elastic wouldn't hold the cover on tight :/ So, I did the next best thing :) Yarn and some really ugly sewing! But hey, It works ;)

Tuesday, March 19, 2013
Cathedral Window Pincushion

Do you like my pincushion?
I saw this picture of a CUTE stack of cathedral window pincushions on IG by Michelle @ilikeorangetoo

(THIS picture is in her flickr photostream)

Michelle told me that she used THIS tutorial over at My Go-Go Life by Kim.

Kim's tutorial was AWESOME!! My little pincushion came together in a snap!
I am planning on making a BUnCH more of these fun little guys :)
Monday, March 18, 2013
I Know What I am Going TO-DO Today and A Quilt Story Time
Super fun news!!! Today I am being featured over at A Quilt Story by Meagan and Heather. I was able to spend a weekend with Heather last month at the Cabin Fever Retreat by Emily Herrick. Heather is AWESOME and we had the best time!!!
Today they are featuring my Whirlygigs Quilt. COOL!!!

Head on over and check it out after you are through reading about all of my quilting antics below ;)

2 pair of slippers for Aly With my sewing machine in the hospital, I should be able to get these finished this week :)

Today they are featuring my Whirlygigs Quilt. COOL!!!

Head on over and check it out after you are through reading about all of my quilting antics below ;)
WIP's -in some form of progress...
Challenge quilt for The Peteetneet Quilt Show
"Letters to my Daughter" block of the month (6 finished out of 25)
Medallion Quilt for the Modern Quilt Group I was able to finish three borders this week :) Blogged HERE. Five more borders to go :)
"Letters to my Daughter" block of the month (6 finished out of 25)
Medallion Quilt for the Modern Quilt Group I was able to finish three borders this week :) Blogged HERE. Five more borders to go :)

For Hire Projects
MaryAnne's jean quilt
Back Burner Purgatory... lol!!! ;) (I've got the materials for these, but no chop chop yet)
White booties for Hadley
2 Twin Size applique quilts for my nieces
The June $29 quilt
July $29 Quilt
July $29 Quilt
***BONUS FINISHES***
Hexed by Peeps quilt. Blogged HERE

Ironing Board Cover. Will be blogged HERE on Wednesday
Cathedral Window Pin Cushion. Will be Blogged HERE Tuesday
So, what are you up to this week? PLEASE share with me :)

Sunday, March 17, 2013
Mandy's Quilt [Simple Chevron] Tutorial
My sweet friend Mrya asked me for the pattern for this quilt. I figured it would make a good tutorial for y'all :)
This quilt is really simple. I have used this technique on several previous quilts. You can check them out HERE, HERE, HERE, HERE, HERE & HERE. The first two links are exactly the same as Mandy's quilt. The last two are the same block, they are just set on point.
For this tutorial, I will be sharing the "not on point" version ;)
First things first, every quilt must begin with a little bit of graph paper and what I call a "map." Here is my "map" for this quilt.

There is a basic premise to this type of quilt. Your blocks need to be square and you need at least 2 different fabrics. If you want your chevron to show up, you will need the fabrics to have a good contrast or a good difference in value. I tend to use white for my chevron.


For Mandy's quilt, here are my measurements:
White- 3" x 8.5"
Prints- 6" x 8.5"
Makes an 8.5" block :)
I used a 7 x 9 block layout for a total of 63 blocks for Mandy's quilt.
Now, I ended up strip piecing this. I needed 16 strip sets. So here are my strip piecing measurements:
White- 16 strips 3" by wof
Prints- 16 strips 6" by wof
Here comes the fun part. Sew a white strip to a print fabric and press :) Next, sub cut all of the strip sets into 8.5" blocks. Ta da!!!
For the layout, I always follow my "map." There will actually only be two ways the blocks will be placed. The white stripe will be either on the top or the bottom, consistently and the other will be either on the left or the right, consistently. So, the first block in the first row should be placed with the white stripe on the bottom. The second block will be placed with the white stripe on the right. The third, with the white stripe on the bottom and so on across the row. For the next row, you do the opposite.
Can you see the placement in the quilt below?

If I add borders, I usually do them in the same color as the non print fabric (always white in my case).
For Mandy's quilt, I added a 6" white border.

Did I forget anything? Anything else you would like to know?
Good luck!!
xo
This quilt is really simple. I have used this technique on several previous quilts. You can check them out HERE, HERE, HERE, HERE, HERE & HERE. The first two links are exactly the same as Mandy's quilt. The last two are the same block, they are just set on point.
For this tutorial, I will be sharing the "not on point" version ;)
First things first, every quilt must begin with a little bit of graph paper and what I call a "map." Here is my "map" for this quilt.

There is a basic premise to this type of quilt. Your blocks need to be square and you need at least 2 different fabrics. If you want your chevron to show up, you will need the fabrics to have a good contrast or a good difference in value. I tend to use white for my chevron.

You can see in this quilt, I used multiple prints to make up each square block. All of the strips in this quilt are 2.5" wide.

In this quilt I used wider white and narrower print fabric. (and it's on point)
White- 3" x 8.5"
Prints- 6" x 8.5"
Makes an 8.5" block :)
I used a 7 x 9 block layout for a total of 63 blocks for Mandy's quilt.
Now, I ended up strip piecing this. I needed 16 strip sets. So here are my strip piecing measurements:
White- 16 strips 3" by wof
Prints- 16 strips 6" by wof
Here comes the fun part. Sew a white strip to a print fabric and press :) Next, sub cut all of the strip sets into 8.5" blocks. Ta da!!!
For the layout, I always follow my "map." There will actually only be two ways the blocks will be placed. The white stripe will be either on the top or the bottom, consistently and the other will be either on the left or the right, consistently. So, the first block in the first row should be placed with the white stripe on the bottom. The second block will be placed with the white stripe on the right. The third, with the white stripe on the bottom and so on across the row. For the next row, you do the opposite.
Can you see the placement in the quilt below?

If I add borders, I usually do them in the same color as the non print fabric (always white in my case).
For Mandy's quilt, I added a 6" white border.

Did I forget anything? Anything else you would like to know?
Good luck!!
xo
Saturday, March 16, 2013
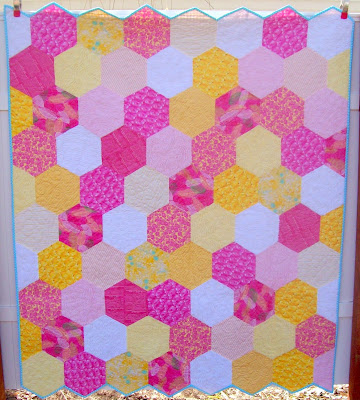
Hexed by Peeps
I have a confession.... I LOVE Peeps, you know, the marshmallow chicks and bunnies.
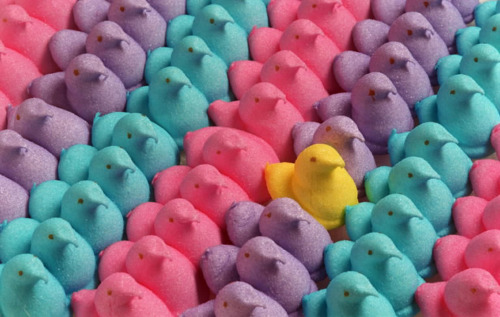
They have always been my FAVORITE Easter candy :)
A few weeks ago, while Emily and I were on a visit to Thimbles & Threads in Draper, Utah, we saw that they had glittery Peep fabric :) I didn't buy any that day, but when we went back this past Thursday, I just had to get some :)
I wasn't sure what in the world I would do with them, but then the idea struck. How about a LARGE hexy quilt with other awesome pink and yellow fabric? Em and I scoured the clearance room at Thimbles & Threads and found the perfect coordinating fabrics. I also bought the JayBirds Hex N More Ruler. (Emily said it was well worth the $$).

Thursday night I was at home trying to think of what neutrals I could throw into the quilt. Suddenly I remembered that I have PINK, WHITE AND YELLOW chenille fabric :) PERFECT!! :)

I woke up early Friday morning with the idea that it would be AWESOME to complete a WHOLE quilt in one day :)

I started out cutting these into the 8- 1/2 " hexies.
Aren't they cute?

Next comes the sewing into rows.

I sewed 8 hexies down and 10 rows across.

I sewed the rows together in pairs, and then the pairs into the whole top.
"Y" seams are my friends. "Y" seams are my friends. "Y" seams are my friends.

Isn't it pretty :) Maggie's Classy Hooch Press ROCKS!!!

For the binding, I wanted something that had a little pop to it. ...and maybe was the same color as a Peep ;)
This Michael Miller Happy Tones aqua was perfect.

The colors are so sweet :)

I need me some Peeps!

Cheerful.

For the back, I used some vintage lavender gingham fabric from my friends grandmothers attic :)

(I really like this quilt)

The pinked edge was nice and easy.

I even forgot to cut the binding on the bias :o

For the quilting I attempted the pebble in pebble fmq from Natalia Bonner's Beginners Guide to Free-Motion Quilting.

I had a hard time getting into the rhythm of it, so I periodically switched to other fmq motifs :) A little loopy fmq, a few swirls and even some random wavy lines.

I really never make holiday quilts, but I surely had to make and exception for the over the top, super COOL Peep fabric :)
So, did I make the WHOLE quilt in one day? Sadly, no. :( I had to go to a church party (which was AWESOME) and at 11 pm my eyes started to cross so the last side of binding had to wait until Saturday morning :(
The quilt is 60" x 69"
Subscribe to:
Posts (Atom)