Saturday, August 31, 2013

I'm a Chef!!!!

Check out the Moda Bakeshop!!!  I AM A CHEF!!!  


I am pretty excited in a bit of a geeky way :)

(I kinda feel like a cool kid) ....LOL!!! :D

Friday, August 30, 2013

Konda's Round Robin Medallion

****WARNING!!!!  KONDA!!!! DO NOT PROCEED!!!****

This is a sacrificial picture because Konda's blog reader show's her the first picture on each of my blog posts...LOL!!!  (BTW, this is a blurry pic of a GIANT splinter my husband pulled out of my foot a while back)  OUCH!!!

Any Hoots, for August, I really had Konda's Round Robin Medallion to work on :)  


I added the small turquoise border, the 1" red math border and the black & white checker border.


Katie added this awesome paper pieced Pi border.


Konda is a math professor, so it is PERFECT!!!


Annette added this super cool woven stripe border with a bicycle embroidery.  
Konda also LOVES to ride bikes!

I am actually short one row of checker boards :/  Fortunately, Emily has a bit more of the black and white fabric so I will add it on Thursday before I hand it off to Emily to work her magic! :)

Wednesday, August 28, 2013

Ella's Round Robin Applique

WARNING!!!
*** NO LOOKING ELLA!!!****

I cut in line to add Ella's name to her center.  I thought I should do the hand work before the quilt became too big!! ;D


For Ella, I added her name using a Celtic Knot tutorial I was given by my neighbor.


I used a pressing bar to make the bias tube.  The strip is 1/4" wide.


This border by Amber ROCKS!!  They are little paper pieced spools!  WOW!


Ella did an awesome job paper piecing her pink sewing machine :)

More of these AWESOME spools!

One last close up of my hand stitching :)  Not too shabby ;D

Monday, August 26, 2013

Maggie's Monogram

*****MAGGIE!!!  DO NOT LOOK AT THIS POST!!!*****

For two of the ladies in our Round Robin Medallion group, they requested I add a monogram to their quilts for my addition.


This is Maggie's medallion.


She paper pieced these awesome spools for her center.


For her "M" I used a back basting needle turn applique method.


Natalie is turning it on point for her turn. ....pun intended.  She let me sneak in and add my monogram before the quilt top got too big.  She had her "on point" corners all ready, so I had to add them and take  a picture :)

Saturday, August 24, 2013

Over the Rainbow Tutorial

Pennie Pins over a flicker requested a tutorial for my Over the Rainbow Quilts :)  Here you go, Pennie!  Happy quilting!!  Please ask any questions you may have down in the comments.  I will answer them there :)

This is the first one I designed for my daughter Kate.  It is a twin size quilt.  Blogged HERE

My sisters Aly's quilt (king size), requested to be just like Kate's.  Blogged HERE

For both of these quilts I started with a jelly roll of Piece O' Cake's Treasures and Tidbits by Robert Kaufman.  For Kate's quilt I used one jelly roll and for Aly's I used 3 jelly rolls, but ended up making three matching euro shams too ;)


The first thing you need to do is decide how big you want your blocks.
My blocks ended up being 10" square.  Any square size will work with this layout.

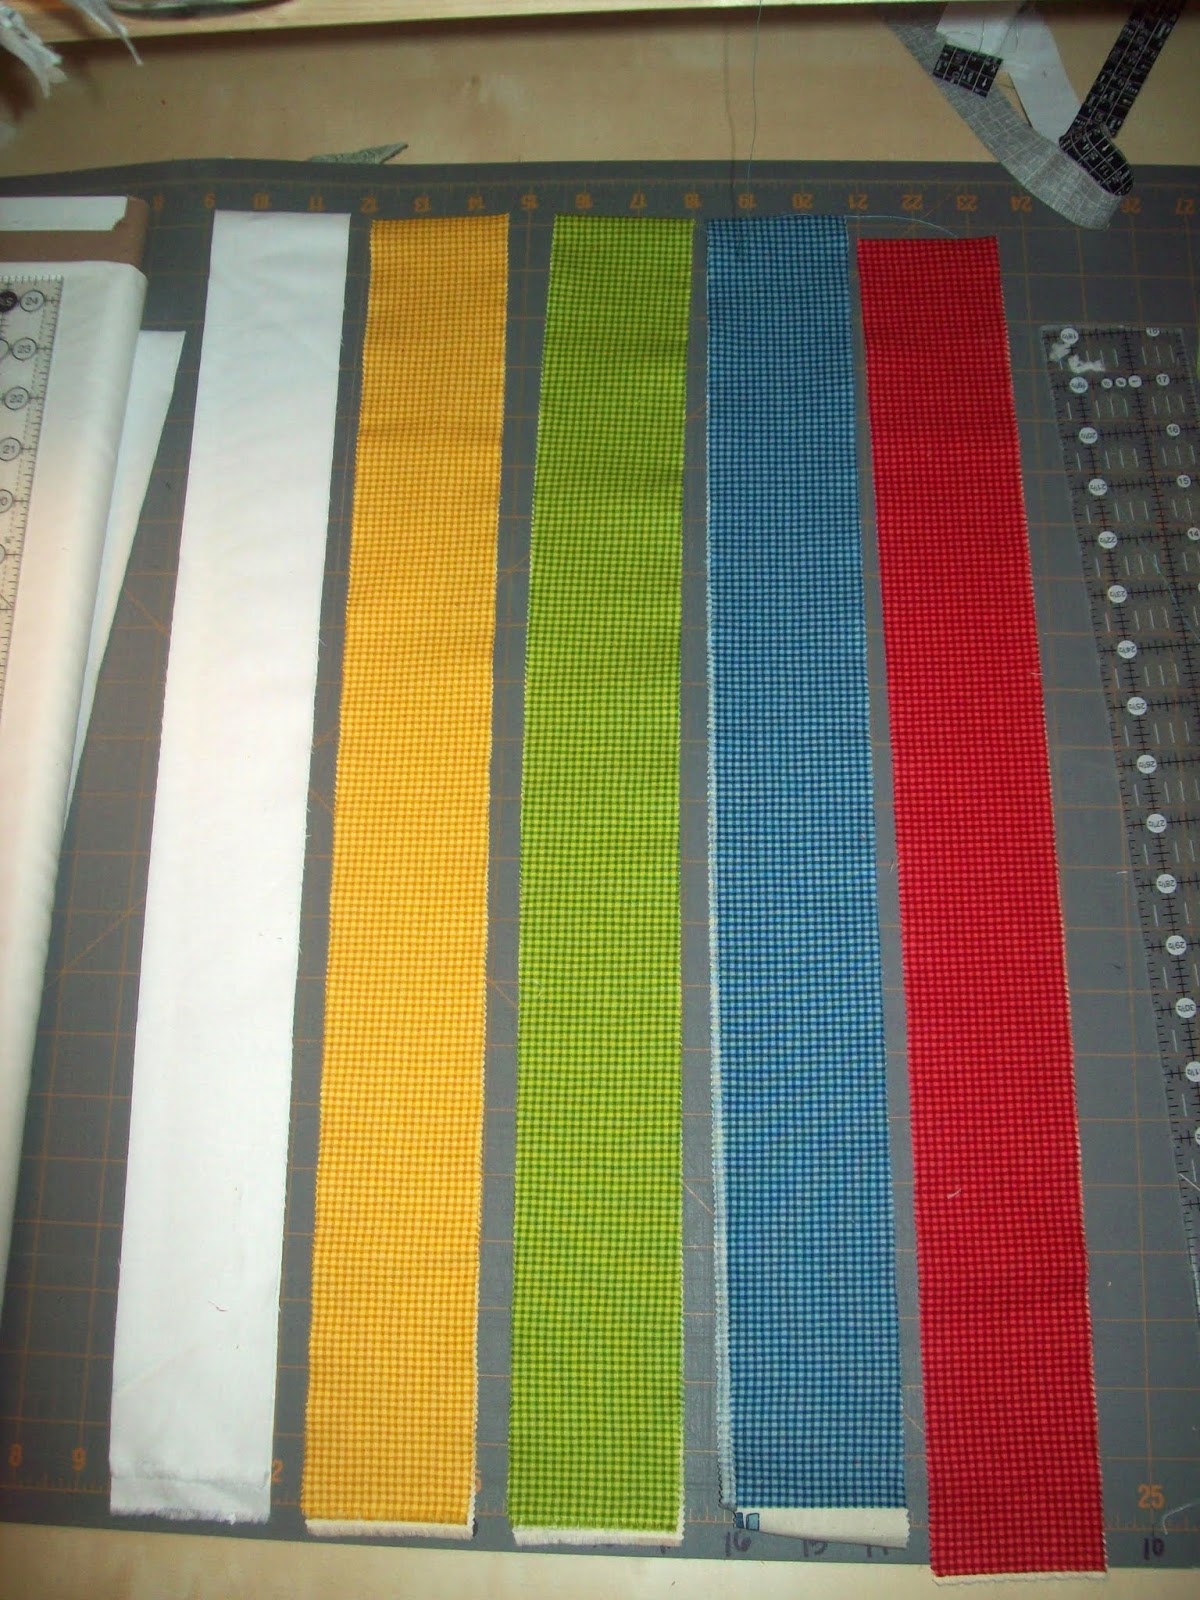
To make 10" squares using a jelly roll, you will need to arrange your 2.5" strips into groups of four that coordinate.  (For the "Over the Rainbow" quilts, you can see I put like colors with like colors, with the darkest color furthest away from the white).

(for demo sake, I have used these cheery-not-so-matching jelly roll strips)

In order to get a "zigzag" design and and make my block square, I added a 2.5" by wof (width of fabric) white strip to each block.

Next you will sew your strip sets together, one white with four colored strips.  You will end up with a 42" by 10.5" strip set.  Press well.

Back side, all pressed and happy :)  (Pay no mind to my gingham ironing board cover :\)

Right side pressed & pretty.

Now for the trimming :)  You will need to trim the strip set down to four,10" squares.

*** Take note, if you have sewn perfect 1/4" seams, you will have an extra 1/2" (note size of strip set 42"x 10.5")  You could have cut your white to only 2" wide by wof if you are perfect and confident that your seams are precise.  I prefer to use a 2.5" wide white strip so I will have a little wiggle room, so my blocks can be trimmed perfectly to 10" square.

ALSO!!!  Be sure to cut your strip set apart into ten inch sections first.  As pictured below.

Line up your bottom edge on your cutting mat.  Trim off the selvage edges.

Slide your ruler over to cut at the 10" mark and trim.
(The angle of the picture makes the block look curvy, but it's not ;)

Next, trim the white strip side of the block to make the block 10" square.  You want all of your printed/colored strips to remain the same size as each other.  Your white strip is where all of the trimming should take place :) ...as pictured below...


Ta-da, a 10" block :)


Now for the layout.  This will take some time if you are using a jelly roll and want your colors to end up in a design.

Clear off your living room floor and start playing with the layout.  If you want a "zigzag', you just need to rotate the direction of your white (or solid) strip.  I have a picture of what I am going for next to me as I lay out the blocks, to help with the layout.


Once they are perfect... or pretty good ;), sew up your rows, and then sew up your rows :)  Press well.

I decided for Kate's that the quilt needed to be larger, so I added a wide white border to make it twin size.  For Aly's I added white borders to make the quilt fit her extra tall king size mattress.


Then quilt and bind as desired :)

Happy sewing :)

Cut Foot Loose!!

My good friends over the the American Fork Presbyterian Church need our help!


It's BEAUTIFUL windows are in need of some serious restoration.

Here is how we can help!


As an added bonus, I will be doing a trunk show on Saturday at 1:00 pm. :)

Hope to see you there!

Thursday, August 22, 2013

Small Matroyshka Dolls


I started to make these for a pillow for my bed :)


 I need to make two more.
My buddies at the SLMQG think I should use googly eyes ;)


These are all made with back basting needle turn applique :)

Emily Herrick designed the pattern and it will be available soon.

Tuesday, August 20, 2013

GIANT Matroyshka Doll

My mom needed a special birthday present :)


She has been working on a red and white Dresden plate medallion quilt for her room.


I thought a fun Matroyshka doll would look great with it :)


The doll is all done with needle back basted turn applique.
She measures about 17" tall.


Emily Herrick designed the pattern.  It will be available soon :)

Monday, August 12, 2013

Family Reunion

I'm going to have to catch y'all up to date in a bit.... we just got back from a super fun family reunion up in the high Uintas at Moon Lake.

My cute little family :)
(after three days of camping)

This is a shot of all 36 of us.

I'll post more later... after I battle the laundry!  YIKES!!!

Friday, August 9, 2013

National Book Lover Day

In honor of National Book Lover Day, the Moda Bake Shop is having fun blog tour about our first quilting book.


So, my quilting adventure started January 18th, 2012... you may be asking yourself, "How on earth could she possible know the day she started quilting?"   You can read all about my adventurous quilting beginnings, HERE and HERE.

Within a day or two of starting to quilt, I was at JoAnn Fabric and miraculously happened upon the MOST AWESOME quilting book ever!!!  To this day I still think there was a little divine intervention in quilting book isle at JoAnn's.


(You can read my blog post about buying the book HERE)

I instantly fell in love with the patterns in the book.... the initial reason I bought the book.  Once I got it home, I read it from cover to cover.  I had never heard of a person quilting their own quilts on their home machine before.  What?  Could this be true?  I was so inspired by the WHOLE book!

One of my favorite tips was in her directions about how to prepare a quilt sandwich or baste a quilt.  Her method is fantastic!!!

I have even made one of the quilts from this book.


My second daughter loved it and requested it for her 18th birthday.  Blogged HERE.

Since my first days of quilting, I have purchased many, many quilting books.  My current fave is Natalia Bonner's Beginner's Guide to Free-Motion Quilting.


I fmq most all of my quilts myself and Natalia's instructions and illustrations make learning to improve my fmq a snap!  Natalia is a machine quilting GENIUS! :) ...if only I could get my feathers to look more like hers and less like chubby bums ;D

So, what are your favorite quilting books?  Please, oh please, share :)

xo


Wednesday, August 7, 2013

Grandmother's Garden Progress

I was able to baste more hexies last week :)


I found this website that has a hexy calculator.  You type in the dimensions of the quilt you want to make, and it calculates how many hexies you need to make :)  The website is CD Designs and you can get to the calculator HERE.

According to this calculator, I will need 2930 one inch hexies to make a full size quilt.  So I need 418.57 flowers :)  So lets just say that I will only need 418 flowers.

Here are my tallies:
418 flowers needed, 10 flowers made, 408 left to go.
2926 hexies needed, 256 made, 2670 left to go.

Monday, August 5, 2013

I Know What I am Going To-Do Today

Oops.... I scheduled this post last week, but forgot to finish it :/  These busy summer days are leaving me with a bit of oatmeal for brains :)

Last week was SUPER fruitful as far as sewing goes.  I LOVE weeks like that!

xo and happy reading :)

PS- Be sure to stop by on Friday for my stop on Moda's celebration of National Book Lover's Day Friday the 9th :)


WIP's -in some form of progress...
"Letters to my Daughter" block of the month (10 finished out of 25)
Kate's skirts
Operations Sunshine quilts for Myra
Giant Star Baby Blanket for charity Top FINISHED! :)

Ashley's skirt
Voile skirt for me
EPP Grandmothers Garden Progress Blogged HERE 10 flowers completed, 186 hexies basted. 2674 more hexies to go :/

Cross stitch Quilt for Jeanene
Anna & Mike's pillows 
String Quilt A few more blocks made :)  A few more million to go...well, not maybe a million, but more :) Blogged HERE!

****BONUS FINISHES****

Two of four back-basted needle turn applique's for a pillow sham for my bed.  I can't show you because the pattern is top secret for a bit :/

I also made a special quilt label for Karen's Quilt. Blogged HERE!


Back Burner Purgatory... lol!!! ;) (I've got the materials for these, but no chop chop yet)
2 Twin Size applique quilts for my nieces
EPP sewing Kit

Will be linking up with Amanda Jean over at Crazy Mom QuiltsQuilt Story  and Lee over at Freshly Pieced.